Electric Sauna Heaters
Installation
The manufacturer’s warranty guarantee is invalid if the heater and sauna room have been dimensioned incorrectly!
Before installation, check the following points:
1) Check that the maximum amperage of the main fuse matches or exceeds the heater’s specifications
It is critical to confirm that the maximum amperage of the main fuse is suitable for the heater’s specifications before proceeding with installation. This precaution helps to prevent overloading, electrical malfunctions, and ensures the safe and reliable operation of the heater.

2) Does the output (kW) match the volume (ft³ / m3) of the sauna room?
In case there are any uninsulated brick, tile or glass walls in the sauna room, an additional volume of 3.3 ft3 / 1 m3 should be added to the sauna room for each square meter of the wall.
Use our sauna calculator to find the heater power best suited to the estimated volume of your steam room.

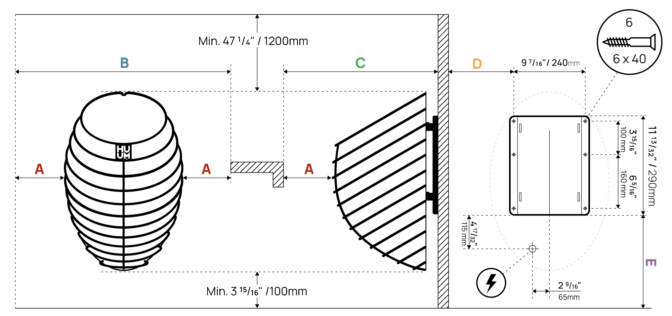
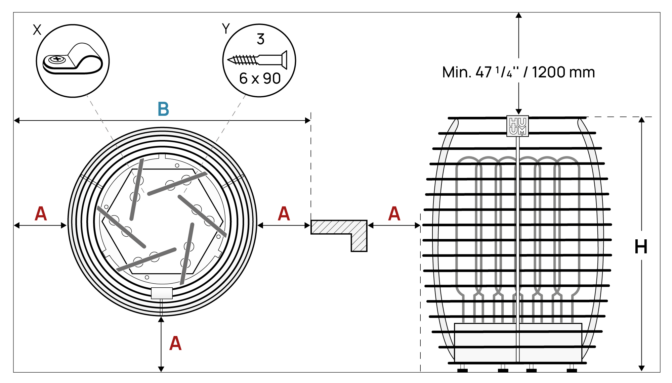
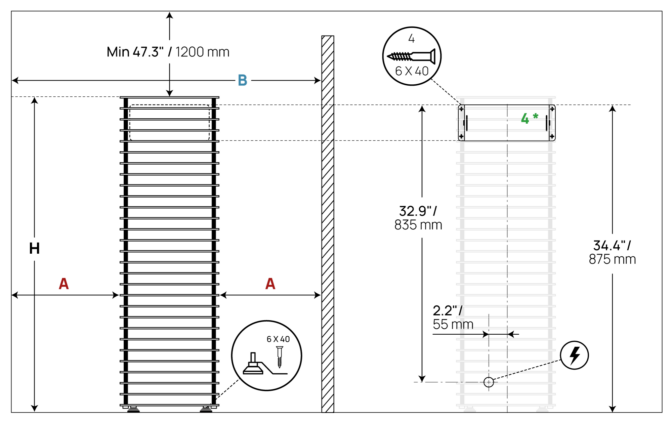
3) Check the safety distances to ensure safe installation
Maintaining proper safety distances around sauna heaters is essential for ensuring safe operations and user safety. Sauna heaters can reach very high temperatures. Ensuring a safe distance minimizes the risk of accidental burns, overheating, or ignition of nearby objects.
NB! Only a certified electrician may connect the heater to the power supply.
- A rubber insulated SIHF-JB cable or an equivalent cable must be used as the connection cable. It is forbidden to use a PVC insulated non-heat-resistant cable as the power cable of the heater.
- The junction box must be waterproof and located up to 19.7 in / 50 cm from the floor.
- It is recommendable to connect the unit to the mains power supply without an earth leakage circuit breaker.
The cross-sectional area of the cable and maximum amperage of the circuit breaker are provided in the table below.
Review safety distances: Check for the minimum safety distances required between the heater, the sauna room’s ceiling, and walls. The distance between the highest point of the heater and combustible ceiling material has to be minimum 1.2 meters.
Position the heater safely: Place the heater at a location that minimizes the risk of accidental contact with the heater.
Functionality: think about the best spot for comfortably pouring water onto the heater.
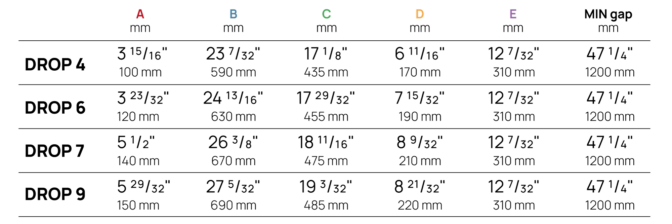
- DROP electric heater;
- wall mount;
- installation and operation manual;
- DROP 9 model of electric heater includes a heat diverter and heating element retainer.
Sauna stones, the sauna controller (e.g. UKU), and the power cable are not included and must be purchased separately.
A rubber insulated SIHF-JB cable or an equivalent cable should be used as the connection cable. Connecting the unit to the mains is recommended without an earth-leakage circuit breaker (RCD).
NB! It is forbidden to use a PVC insulated non-heat-resistant cable as the power cable of the heater.
All electrical work — including cable installation and connection of the sauna heater to the power supply — must be performed by a certified electrician in accordance with local regulations and safety requirements.
DROP electric sauna heater requires 121 lb / 55 kg of sauna stones with a diameter of 2-4 in / 5–10 cm.
It is recommendable to use round stones in HUUM sauna heaters. Round stones complement the design of the heaters and provide milder steam. Our product range includes round olivine diabase sauna stones and are sold in packs weighing 33 lb / 15 kg.
NB! Choose stones that are specifically meant for use in sauna heaters, and avoid decorative stones as they may break easily.
- Wash the stones under running water to remove dust before use.
- Lay the stones one by one. Don’t pour or throw them into the heater!
- Start with larger stones at the bottom and sides, then use smaller stones to fill gaps. Lay the stones tightly but leave space for air circulation.
- Cover the outer surfaces of the heater tightly, ensuring the heating elements are not visible. Exposing them to water shortens their lifespan and creates excessively sharp heat.
You can find the user manual here.
Heating
Throwing water on the hot sauna stones enables you to raise the humidity and the apparent temperature according to your preferences.
- Sauna stones must be hot
The time is right for throwing the water on sauna stones when the stones are hot enough for complete vaporization of the water. You can try this by throwing a small amount of water.
- Use clean and warm water to add the steam
It is wise to use hot tap water to prevent the stones from breaking from the abrupt temperature change.
- Use a small amount of water at once
We recommend throwing approximately 80 ml of water at a time. If you desire more steam, wait a few minutes and throw the same amount of water on the sauna stones. This allows the stones to dry in the meantime and regain their heat. If you notice that water runs out from the bottom of the heater, it means you have poured too much water or that the stones are not hot enough.
Heating elements
Heating elements require replacement only when they are broken. Remove some stones from the sauna heater to verify that all the heating elements are in proper working order. If the heating elements do not turn red, they are likely damaged and must be replaced.
No, a sauna heater should not be used with a broken heating element!
Remove some stones to check that all elements glow red when the heater is on. If one doesn’t, it must be replaced promptly to prevent damage to the other elements.
Safety first! Wear gloves and use pliers when chaning the heating elements!
We recommend to take a picture before disconnecting the wires. This will help later when you have replaced the new heating element and are reconnecting the wires.

Troubleshooting
Are the heating elements functioning properly? To find out, remove some stones from the sauna heater and check if the heating elements warm up after switching the heater on. If a heating element does not turn red, it is damaged and needs to be replaced before further use of the heater.
Are the cables properly connected? Ask an electrician to disconnect the sauna heater from the power supply, and to verify that all cables of the heater and the controller are connected to the main module in accordance with the user manual of the sauna heater.
If this does not solve the problem, take a picture of the main module cabling and email it to your reseller with a description of the problem.
Is the power rating of the sauna heater sufficient for the size of your steam room? Control it from the user manual.
Are the heating elements functioning properly? To find out, remove some stones from the sauna heater and check if the heating elements warm up when the heater is switched on. If a heating element does not turn red, it is damaged and needs to be replaced before further use.
Is there too much ventilation in the steam room? Check the ventilation system in the steam room to ensure it is not allowing excessive airflow. Make sure the air intake and exhaust vents are properly adjusted to maintain a balance between fresh air circulation and heat retention.
A slight difference between the measured temperatures is completely normal. It derives from the intrinsic error of measurement that applies to the devices. However, if the difference exceeds 10–15 degrees, you should check the following:
- Are the temperature sensor and sauna thermometer placed in different locations in the steam room where the temperatures actually differ?
- Is the temperature sensor too close to the sauna heater? Or is it too close to the door?
The best location for the temperature sensor is 19.7 in / 50 cm from the heater and approximately 5.9 in / 15 cm from the ceiling. It should not be placed close to vents and should be min. 19.7 in / 50 cm from the windows and door.
If none of the causes described above apply, and the following problem persist, the fault likely resides in the temperature sensor or its wiring and it requires replacing. Please contact your reseller with a description of the problem and add a picture of your sauna room.
A temperature increase of up to 10 degrees is normal, as the large amount of stones retains heat, causing the temperature to rise slightly. Reason for this is the residual heat: the heating elements or stones in the sauna retain heat and continue to release it, causing the temperature to rise even after the heater stops.
Maintenance
Sauna stones don’t last forever. Contact with water and temperature fluctuations have an impact, and over time they eventually start crumbling. Therefore it is natural that every now and then they should be replaced with new stones.
Check the condition of sauna rocks once a year or after 300 hours of heating. If you heat your sauna three times a week on average, you should replace the sauna stones once a year. If you use your sauna less frequently, you should exchange the sauna stones once every couple of years.
The condition of the sauna heater should be checked every now and then. This is particularly important when the sauna heater has not been used for a while.
- Check the heating elements periodically for signs of wear, corrosion, or damage. Replace them if they appear burnt out or malfunctioning.
- Wipe the dust and dirt from the sauna heater with a moist cloth.
Heater accessories
Yes, we recommend using protective railings with your sauna heater, especially in smaller or more compact sauna spaces where the risk of accidental contact is higher. Protective railings provide an important layer of safety. However, it’s important to note that while protective railings significantly enhance safety, they do not eliminate all risks.
Click here to learn how to install the DROP heater safety railing.
When the heater is embedded, at least 375 mm of the heater should protrude from the sauna bench surface.
Click here to learn how to install the DROP electric heater embedding flange.
Installation
The producer’s warranty guarantee is invalid if the heater and sauna room have been dimensioned incorrectly!
Before installation, check the following points:
1) Check that the maximum amperage of the main fuse matches or exceeds the heater’s specifications
It is critical to confirm that the maximum amperage of the main fuse is suitable for the heater’s specifications before proceeding with installation. This precaution helps to prevent overloading, electrical malfunctions, and ensures the safe and reliable operation of the heater.


2) Does the output (kW) match the volume (ft³ / m3) of the sauna room?
In case there are any uninsulated brick, tile or glass walls in the sauna room, an additional volume of 3.3 ft3 / 1 m3 should be added to the sauna room for each square meter of the wall.
Use our sauna calculator to find the heater power best suited to the estimated volume of your steam room.
3) Check the safety distances to ensure safe installation
Maintaining proper safety distances around sauna heaters is essential for ensuring safe operations and user safety. Sauna heaters can reach very high temperatures. Ensuring a safe distance minimizes the risk of accidental burns, overheating, or ignition of nearby objects.

NB! Only a certified electrician may connect the heater to the power supply.
- A rubber insulated SIHF-JB cable or an equivalent cable must be used as the connection cable. It is forbidden to use a PVC insulated non-heat-resistant cable as the power cable of the heater.
- The junction box must be waterproof and located up to 19.7 in / 50 cm from the floor.
- It is recommendable to connect the unit to the mains power supply without an earth leakage circuit breaker.
The cross-sectional area of the cable and maximum amperage of the circuit breaker are provided in the table below.
–
Review safety distances: Check for the minimum safety distances required between the heater, the sauna room’s ceiling, and walls. The distance between the highest point of the heater and combustible ceiling material has to be minimum 1.2 meters.
Position the heater safely: Place the heater at a location that minimizes the risk of accidental contact with the heater.
Functionality: think about the best spot for comfortably pouring water onto the heater.
- HIVE or HIVE Mini electric heater;
- adjustable legs (x4);
- airtunnel;
- installation and operation manual.
Sauna stones, the sauna controller (e.g. UKU), and the power cable are not included and must be purchased separately.
A rubber insulated SIHF-JB cable or an equivalent cable should be used as the connection cable. Connecting the unit to the mains is recommended without an earth-leakage circuit breaker (RCD).
NB! It is forbidden to use a PVC insulated non-heat-resistant cable as the power cable of the heater.
All electrical work — including cable installation and connection of the sauna heater to the power supply — must be performed by a certified electrician in accordance with local regulations and safety requirements.
HIVE electric sauna heater requires 551 lb / 250 kg of sauna stones with a diameter of 2-4 in / 5–10 cm.
HIVE Mini electric sauna heater requires 330 lb / 150 kg of sauna stones with a diameter of 2-4 in / 5–10 cm.
It is recommendable to use round stones in HUUM sauna heaters. Round stones complement the design of the heaters and provide milder steam. Our product range includes round olivine diabase sauna stones and are sold in packs weighing 33 lb / 15 kg.
NB! Choose stones that are specifically meant for use in sauna heaters, and avoid decorative stones as they may break easily.
- Wash the stones under running water to remove dust before use.
- Lay the stones one by one. Don’t pour or throw them into the heater!
- Start with larger stones at the bottom and sides, then use smaller stones to fill gaps. Lay the stones tightly but leave space for air circulation.
- Cover the outer surfaces of the heater tightly, ensuring the heating elements are not visible. Exposing them to water shortens their lifespan and creates excessively sharp heat.
You can find the user manual here.
Heating
Throwing water on the hot sauna stones enables you to raise the humidity and the apparent temperature according to your preferences.
- Sauna stones must be hot
The time is right for throwing the water on sauna stones when the stones are hot enough for complete vaporization of the water. You can try this by throwing a small amount of water.
- Use clean and warm water to add the steam
It is wise to use hot tap water to prevent the stones from breaking from the abrupt temperature change.
- Use a small amount of water at once
We recommend throwing approximately 80 ml of water at a time. If you desire more steam, wait a few minutes and throw the same amount of water on the sauna stones. This allows the stones to dry in the meantime and regain their heat. If you notice that water runs out from the bottom of the heater, it means you have poured too much water or that the stones are not hot enough.
Heating elements
Heating elements require replacement only when they are broken. Remove some stones from the sauna heater to verify that all the heating elements are in proper working order. If the heating elements do not turn red, they are likely damaged and must be replaced.
No, a sauna heater should not be used with a broken heating element!
Remove some stones to check that all elements glow red when the heater is on. If one doesn’t, it must be replaced promptly to prevent damage to the other elements.
Safety first! Wear gloves and use pliers when chaning the heating elements!
We recommend to take a picture before disconnecting the wires. This will help later when you have replaced the new heating element and are reconnecting the wires.
Troubleshooting
Are the heating elements functioning properly? To find out, remove some stones from the sauna heater and check if the heating elements warm up after switching the heater on. If a heating element does not turn red, it is damaged and needs to be replaced before further use of the heater.
Are the cables properly connected? Ask an electrician to disconnect the sauna heater from the power supply, and to verify that all cables of the heater and the controller are connected to the main module in accordance with the user manual of the sauna heater.
If this does not solve the problem, take a picture of the main module cabling and email it to your reseller with a description of the problem.
Is the power rating of the sauna heater sufficient for the size of your steam room? Control it from the user manual.
Are the heating elements functioning properly? To find out, remove some stones from the sauna heater and check if the heating elements warm up when the heater is switched on. If a heating element does not turn red, it is damaged and needs to be replaced before further use.
Is there too much ventilation in the steam room? Check the ventilation system in the steam room to ensure it is not allowing excessive airflow. Make sure the air intake and exhaust vents are properly adjusted to maintain a balance between fresh air circulation and heat retention.
A slight difference between the measured temperatures is completely normal. It derives from the intrinsic error of measurement that applies to the devices. However, if the difference exceeds 10–15 degrees, you should check the following:
- Are the temperature sensor and sauna thermometer placed in different locations in the steam room where the temperatures actually differ?
- Is the temperature sensor too close to the sauna heater? Or is it too close to the door?
The best location for the temperature sensor is 19.7 in / 50 cm from the heater and approximately 5.9 in / 15 cm from the ceiling. It should not be placed close to vents and should be min. 19.7 in / 50 cm from the windows and door.
If none of the causes described above apply, and the following problem persist, the fault likely resides in the temperature sensor or its wiring and it requires replacing. Please contact your reseller with a description of the problem and add a picture of your sauna room.
A temperature increase of up to 10 degrees is normal, as the large amount of stones retains heat, causing the temperature to rise slightly. Reason for this is the residual heat: the heating elements or stones in the sauna retain heat and continue to release it, causing the temperature to rise even after the heater stops.
Maintenance
Sauna stones don’t last forever. Contact with water and temperature fluctuations have an impact, and over time they eventually start crumbling. Therefore it is natural that every now and then they should be replaced with new stones.
Check the condition of sauna rocks once a year or after 300 hours of heating. If you heat your sauna three times a week on average, you should replace the sauna stones once a year. If you use your sauna less frequently, you should exchange the sauna stones once every couple of years.
The condition of the sauna heater should be checked every now and then. This is particularly important when the sauna heater has not been used for a while.
- Check the heating elements periodically for signs of wear, corrosion, or damage. Replace them if they appear burnt out or malfunctioning.
- Wipe the dust and dirt from the sauna heater with a moist cloth.
Heater accessories
Yes, we recommend using protective railings with your sauna heater, especially in smaller or more compact sauna spaces where the risk of accidental contact is higher. Protective railings provide an important layer of safety. However, it’s important to note that while protective railings significantly enhance safety, they do not eliminate all risks.
Click here to learn how to install the HIVE heater safety railing.
When the heater is embedded, at least 350 mm of the heater should protrude from the sauna bench surface.
Click here to learn how to install the HIVE electric heater embedding flange.
The reflector is an optional accessory that reflects back the heat that emanates from the heater. It helps to reduce the safety distances from the walls by half.
The reflector is made of stainless steel, and it is attached to the fins of the heater. It is also possible to connect several reflectors for obtaining a larger surface.
Click here to learn how to install the HIVE electric heater heat reflector.
Installation
The producer’s warranty guarantee is invalid if the heater and sauna room have been dimensioned incorrectly!
Before installation, check the following points:
1) Check that the maximum amperage of the main fuse matches or exceeds the heater’s specifications
It is critical to confirm that the maximum amperage of the main fuse is suitable for the heater’s specifications before proceeding with installation. This precaution helps to prevent overloading, electrical malfunctions, and ensures the safe and reliable operation of the heater.


2) Does the output (kW) match the volume (m3) of the sauna room?
In case there are any uninsulated brick, tile or glass walls in the sauna room, an additional volume of 3.3 ft3 / 1 m3 should be added to the sauna room for each square meter of the wall.
Use our sauna calculator to find the heater power best suited to the estimated volume of your steam room.
3) Check the safety distances to ensure safe installation
Maintaining proper safety distances around sauna heaters is essential for ensuring safe operations and user safety. Sauna heaters can reach very high temperatures. Ensuring a safe distance minimizes the risk of accidental burns, overheating, or ignition of nearby objects.
NB! Only a certified electrician may connect the heater to the power supply.
- A rubber insulated SIHF-JB cable or an equivalent cable must be used as the connection cable. It is forbidden to use a PVC insulated non-heat-resistant cable as the power cable of the heater.
- The junction box must be waterproof and located up to 19.7 in / 50 cm from the floor.
- It is recommendable to connect the unit to the mains power supply without an earth leakage circuit breaker.
The cross-sectional area of the cable and maximum amperage of the circuit breaker are provided in the table below.
Review safety distances: Check for the minimum safety distances required between the heater, the sauna room’s ceiling, and walls. The distance between the highest point of the heater and combustible ceiling material has to be minimum 1.2 meters.
Position the heater safely: Place the heater at a location that minimizes the risk of accidental contact with the heater.
Functionality: think about the best spot for comfortably pouring water onto the heater.
- CLIFF electric heater;
- adjustable legs (x4);
- wooden blocks for opening the ribs of the heater (2 pcs);
- airtunnel;
- installation and operation manual;
HUUM CLIFF Mini kit includes a wall mounting plate.
Sauna stones, the sauna controller (e.g. UKU), and the power cable are not included and must be purchased separately.
A rubber insulated SIHF-JB cable or an equivalent cable should be used as the connection cable. Connecting the unit to the mains is recommended without an earth-leakage circuit breaker (RCD).
NB! It is forbidden to use a PVC insulated non-heat-resistant cable as the power cable of the heater.
All electrical work — including cable installation and connection of the sauna heater to the power supply — must be performed by a certified electrician in accordance with local regulations and safety requirements.
CLIFF electric sauna heater requires 165.4 lb / 75 kg of sauna stones with a diameter of 1.2-2 in / 3-5 cm.
CLIFF Mini electric sauna heater requires 132.3 lb / 60 kg of sauna stones with a diameter of 1.2-2 in / 3-5 cm.
It is recommendable to use round stones in HUUM sauna heaters. Round stones complement the design of the heaters and provide milder steam. Our product range includes round olivine diabase sauna stones and are sold in packs weighing 33 lb / 15 kg.
NB! Choose stones that are specifically meant for use in sauna heaters, and avoid decorative stones as they may break easily.
- Wash the stones under running water to remove dust before use.
- Lay the stones one by one. Don’t pour or throw them into the heater!
- Start with larger stones at the bottom and sides, then use smaller stones to fill gaps. Lay the stones tightly but leave space for air circulation.
- Cover the outer surfaces of the heater tightly, ensuring the heating elements are not visible. Exposing them to water shortens their lifespan and creates excessively sharp heat.
To simplify the installation of stones, the heater ribs can be removed as follows:
- Loosen the threaded bar nuts at the base of the heater by approximately 5 mm.
- Insert wooden blocks between the heater ribs – this will help release the rib on both sides.
- Carefully remove the rib, first from the right end and then from the left end.
- You can then remove the rib directly below in the same manner.
Note: Always pull the rib straight out from the heater without twisting or using force to avoid bending the pins!
When reinstalling the ribs, reverse the order – first attach the left end, then the right end.
You can find the user manual here.
Heating
Throwing water on the hot sauna stones enables you to raise the humidity and the apparent temperature according to your preferences.
- Sauna stones must be hot
The time is right for throwing the water on sauna stones when the stones are hot enough for complete vaporization of the water. You can try this by throwing a small amount of water.
- Use clean and warm water to add the steam
It is wise to use hot tap water to prevent the stones from breaking from the abrupt temperature change.
- Use a small amount of water at once
We recommend throwing approximately 80 ml of water at a time. If you desire more steam, wait a few minutes and throw the same amount of water on the sauna stones. This allows the stones to dry in the meantime and regain their heat. If you notice that water runs out from the bottom of the heater, it means you have poured too much water or that the stones are not hot enough.
Heating elements
Heating elements require replacement only when they are broken. Remove some stones from the sauna heater to verify that all the heating elements are in proper working order. If the heating elements do not turn red, they are likely damaged and must be replaced.
No, a sauna heater should not be used with a broken heating element!
Remove some stones to check that all elements glow red when the heater is on. If one doesn’t, it must be replaced promptly to prevent damage to the other elements.
Safety first! Wear gloves and use pliers when chaning the heating elements!
We recommend to take a picture before disconnecting the wires. This will help later when you have replaced the new heating element and are reconnecting the wires.
Troubleshooting
Are the heating elements functioning properly? To find out, remove some stones from the sauna heater and check if the heating elements warm up after switching the heater on. If a heating element does not turn red, it is damaged and needs to be replaced before further use of the heater.
Are the cables properly connected? Ask an electrician to disconnect the sauna heater from the power supply, and to verify that all cables of the heater and the controller are connected to the main module in accordance with the user manual of the sauna heater.
If this does not solve the problem, take a picture of the main module cabling and email it to your reseller with a description of the problem.
Is the power rating of the sauna heater sufficient for the size of your steam room? Control it from the user manual.
Are the heating elements functioning properly? To find out, remove some stones from the sauna heater and check if the heating elements warm up when the heater is switched on. If a heating element does not turn red, it is damaged and needs to be replaced before further use.
Is there too much ventilation in the steam room? Check the ventilation system in the steam room to ensure it is not allowing excessive airflow. Make sure the air intake and exhaust vents are properly adjusted to maintain a balance between fresh air circulation and heat retention.
A slight difference between the measured temperatures is completely normal. It derives from the intrinsic error of measurement that applies to the devices. However, if the difference exceeds 10–15 degrees, you should check the following:
- Are the temperature sensor and sauna thermometer placed in different locations in the steam room where the temperatures actually differ?
- Is the temperature sensor too close to the sauna heater? Or is it too close to the door?
The best location for the temperature sensor is 19.7 in / 50 cm from the heater and approximately 5.9 in / 15 cm from the ceiling. It should not be placed close to vents and should be min. 19.7 in / 50 cm from the windows and door.
If none of the causes described above apply, and the following problem persist, the fault likely resides in the temperature sensor or its wiring and it requires replacing. Please contact your reseller with a description of the problem and add a picture of your sauna room.
A temperature increase of up to 10 degrees is normal, as the large amount of stones retains heat, causing the temperature to rise slightly. Reason for this is the residual heat: the heating elements or stones in the sauna retain heat and continue to release it, causing the temperature to rise even after the heater stops.
Maintenance
Sauna stones don’t last forever. Contact with water and temperature fluctuations have an impact, and over time they eventually start crumbling. Therefore it is natural that every now and then they should be replaced with new stones.
Check the condition of sauna rocks once a year or after 300 hours of heating. If you heat your sauna three times a week on average, you should replace the sauna stones once a year. If you use your sauna less frequently, you should exchange the sauna stones once every couple of years.
The condition of the sauna heater should be checked every now and then. This is particularly important when the sauna heater has not been used for a while.
- Check the heating elements periodically for signs of wear, corrosion, or damage. Replace them if they appear burnt out or malfunctioning.
- Wipe the dust and dirt from the sauna heater with a moist cloth.
Heater accessories
Yes, we recommend using protective railings with your sauna heater, especially in smaller or more compact sauna spaces where the risk of accidental contact is higher. Protective railings provide an important layer of safety. However, it’s important to note that while protective railings significantly enhance safety, they do not eliminate all risks.
Click here to learn how to install the CLIFF heater safety railing.
When the heater is embedded, at least 550 mm of the heater should protrude from the sauna bench surface.
Click here to learn how to install the CLIFF electric heater embedding flange.
The reflector is an optional accessory that reflects back the heat that emanates from the heater. It helps to reduce the safety distances from the walls by half.
The reflector is made of stainless steel, and it is attached to the fins of the heater. It is also possible to connect several reflectors for obtaining a larger surface.
Click here to learn how to install the CLIFF electric heater reflector.
Installation
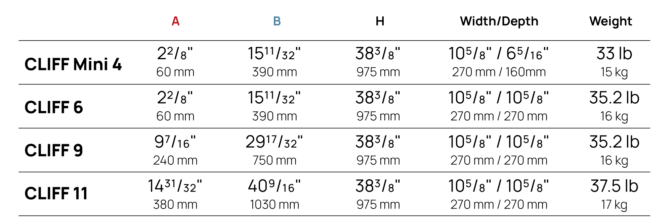
The producer’s warranty guarantee is invalid if the heater and sauna room have been dimensioned incorrectly!
Before installation, check the following points:
1) Check that the maximum amperage of the main fuse matches or exceeds the heater’s specifications
It is critical to confirm that the maximum amperage of the main fuse is suitable for the heater’s specifications before proceeding with installation. This precaution helps to prevent overloading, electrical malfunctions, and ensures the safe and reliable operation of the heater.


2) Does the output (kW) match the volume (m3) of the sauna room?
In case there are any uninsulated brick, tile or glass walls in the sauna room, an additional volume of 3.3 ft3 / 1 m3 should be added to the sauna room for each square meter of the wall.
Use our sauna calculator to find the heater power best suited to the estimated volume of your steam room.
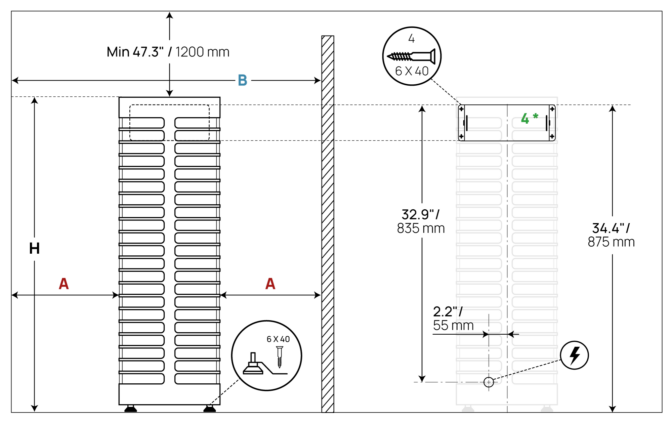
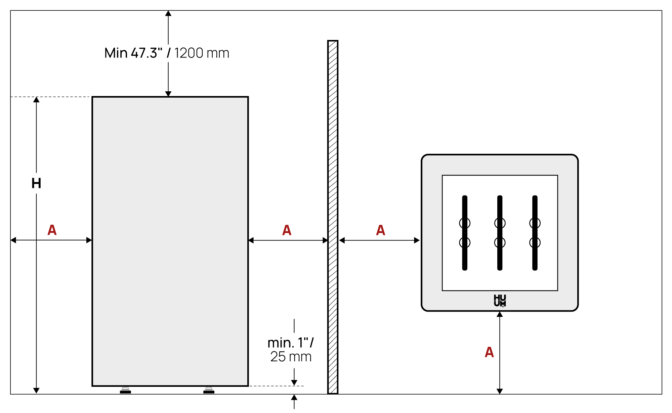
3) Check the safety distances to ensure safe installation
Maintaining proper safety distances around sauna heaters is essential for ensuring safe operations and user safety. Sauna heaters can reach very high temperatures. Ensuring a safe distance minimizes the risk of accidental burns, overheating, or ignition of nearby objects.

NB! Only a certified electrician may connect the heater to the power supply.
- A rubber insulated SIHF-JB cable or an equivalent cable must be used as the connection cable. It is forbidden to use a PVC insulated non-heat-resistant cable as the power cable of the heater.
- The junction box must be waterproof and located up to 19.7 in / 50 cm from the floor.
- It is recommendable to connect the unit to the mains power supply without an earth leakage circuit breaker.
The cross-sectional area of the cable and maximum amperage of the circuit breaker are provided in the table below.
Review safety distances: Check for the minimum safety distances required between the heater, the sauna room’s ceiling, and walls. The distance between the highest point of the heater and combustible ceiling material has to be minimum 1.2 meters.
Position the heater safely: Place the heater at a location that minimizes the risk of accidental contact with the heater.
Functionality: think about the best spot for comfortably pouring water onto the heater.
- STEEL electric heater;
- adjustable legs (x4);
- airtunnel;
- installation and operation manual;
HUUM STEEL Mini kit includes a wall mounting plate
Sauna stones, the sauna controller (e.g. UKU), and the power cable are not included and must be purchased separately.
A rubber insulated SIHF-JB cable or an equivalent cable should be used as the connection cable. Connecting the unit to the mains is recommended without an earth-leakage circuit breaker (RCD).
NB! It is forbidden to use a PVC insulated non-heat-resistant cable as the power cable of the heater.
All electrical work — including cable installation and connection of the sauna heater to the power supply — must be performed by a certified electrician in accordance with local regulations and safety requirements.
STEEL electric sauna heater requires 330 lb / 150 kg of sauna stones with a diameter of 1.2-2 in / 3-5 cm.
STEEL Mini electric sauna heater requires 132.3 lb / 60 kg of sauna stones with a diameter of 1.2-2 in / 3-5 cm.
It is recommendable to use round stones in HUUM sauna heaters. Round stones complement the design of the heaters and provide milder steam. Our product range includes round olivine diabase sauna stones and are sold in packs weighing 33 lb / 15 kg.
NB! Choose stones that are specifically meant for use in sauna heaters, and avoid decorative stones as they may break easily.
- Wash the stones under running water to remove dust before use.
- Lay the stones one by one. Don’t pour or throw them into the heater!
- Start with larger stones at the bottom and sides, then use smaller stones to fill gaps. Lay the stones tightly but leave space for air circulation.
- Cover the outer surfaces of the heater tightly, ensuring the heating elements are not visible. Exposing them to water shortens their lifespan and creates excessively sharp heat.
You can find the user manual here.
Heating
Throwing water on the hot sauna stones enables you to raise the humidity and the apparent temperature according to your preferences.
- Sauna stones must be hot
The time is right for throwing the water on sauna stones when the stones are hot enough for complete vaporization of the water. You can try this by throwing a small amount of water.
- Use clean and warm water to add the steam
It is wise to use hot tap water to prevent the stones from breaking from the abrupt temperature change.
- Use a small amount of water at once
We recommend throwing approximately 80 ml of water at a time. If you desire more steam, wait a few minutes and throw the same amount of water on the sauna stones. This allows the stones to dry in the meantime and regain their heat. If you notice that water runs out from the bottom of the heater, it means you have poured too much water or that the stones are not hot enough.
Heating elements
Heating elements require replacement only when they are broken. Remove some stones from the sauna heater to verify that all the heating elements are in proper working order. If the heating elements do not turn red, they are likely damaged and must be replaced.
No, a sauna heater should not be used with a broken heating element!
Remove some stones to check that all elements glow red when the heater is on. If one doesn’t, it must be replaced promptly to prevent damage to the other elements.
Safety first! Wear gloves and use pliers when chaning the heating elements!
We recommend to take a picture before disconnecting the wires. This will help later when you have replaced the new heating element and are reconnecting the wires.
Troubleshooting
Are the heating elements functioning properly? To find out, remove some stones from the sauna heater and check if the heating elements warm up after switching the heater on. If a heating element does not turn red, it is damaged and needs to be replaced before further use of the heater.
Are the cables properly connected? Ask an electrician to disconnect the sauna heater from the power supply, and to verify that all cables of the heater and the controller are connected to the main module in accordance with the user manual of the sauna heater.
If this does not solve the problem, take a picture of the main module cabling and email it to your reseller with a description of the problem.
Is the power rating of the sauna heater sufficient for the size of your steam room? Control it from the user manual.
Are the heating elements functioning properly? To find out, remove some stones from the sauna heater and check if the heating elements warm up when the heater is switched on. If a heating element does not turn red, it is damaged and needs to be replaced before further use.
Is there too much ventilation in the steam room? Check the ventilation system in the steam room to ensure it is not allowing excessive airflow. Make sure the air intake and exhaust vents are properly adjusted to maintain a balance between fresh air circulation and heat retention.
A slight difference between the measured temperatures is completely normal. It derives from the intrinsic error of measurement that applies to the devices. However, if the difference exceeds 10–15 degrees, you should check the following:
- Are the temperature sensor and sauna thermometer placed in different locations in the steam room where the temperatures actually differ?
- Is the temperature sensor too close to the sauna heater? Or is it too close to the door?
The best location for the temperature sensor is 19.7 in / 50 cm from the heater and approximately 5.9 in / 15 cm from the ceiling. It should not be placed close to vents and should be min. 19.7 in / 50 cm from the windows and door.
If none of the causes described above apply, and the following problem persist, the fault likely resides in the temperature sensor or its wiring and it requires replacing. Please contact your reseller with a description of the problem and add a picture of your sauna room.
A temperature increase of up to 10 degrees is normal, as the large amount of stones retains heat, causing the temperature to rise slightly. Reason for this is the residual heat: the heating elements or stones in the sauna retain heat and continue to release it, causing the temperature to rise even after the heater stops.
Maintenance
Sauna stones don’t last forever. Contact with water and temperature fluctuations have an impact, and over time they eventually start crumbling. Therefore it is natural that every now and then they should be replaced with new stones.
Check the condition of sauna rocks once a year or after 300 hours of heating. If you heat your sauna three times a week on average, you should replace the sauna stones once a year. If you use your sauna less frequently, you should exchange the sauna stones once every couple of years.
The condition of the sauna heater should be checked every now and then. This is particularly important when the sauna heater has not been used for a while.
- Check the heating elements periodically for signs of wear, corrosion, or damage. Replace them if they appear burnt out or malfunctioning.
- Wipe the dust and dirt from the sauna heater with a moist cloth.
Heater accessories
Yes, we recommend using protective railings with your sauna heater, especially in smaller or more compact sauna spaces where the risk of accidental contact is higher. Protective railings provide an important layer of safety. However, it’s important to note that while protective railings significantly enhance safety, they do not eliminate all risks.
Click here to learn how to install the STEEL heater safety railing
When the heater is embedded, at least 21.7 in / 550 mm of the heater should protrude from the sauna bench surface.
Click here to learn how to install the STEEL electric heater embedding flange.
The reflector is an optional accessory that reflects back the heat that emanates from the heater. It helps to reduce the safety distances from the walls by half.
The reflector is made of stainless steel, and it is attached to the fins of the heater. It is also possible to connect several reflectors for obtaining a larger surface.
In case you intend to use the safety railing, attach the reflector before mounting the wooden part of the safety railing.
Important! To ensure convenience of mounting, attach the reflector before stacking the sauna stones.
Click here to learn how to install the STEEL electric heater reflector.
Installation
The producer’s warranty guarantee is invalid if the heater and sauna room have been dimensioned incorrectly!
Before installation, check the following points:
1) Check that the maximum amperage of the main fuse matches or exceeds the heater’s specifications
It is critical to confirm that the maximum amperage of the main fuse is suitable for the heater’s specifications before proceeding with installation. This precaution helps to prevent overloading, electrical malfunctions, and ensures the safe and reliable operation of the heater.


2) Does the output (kW) match the volume (m3) of the sauna room?
In case there are any uninsulated brick, tile or glass walls in the sauna room, an additional volume of 3.3 ft3 / 1 m3 should be added to the sauna room for each square meter of the wall.
Use our sauna calculator to find the heater power best suited to the estimated volume of your steam room.
3) Check the safety distances to ensure safe installation
Maintaining proper safety distances around sauna heaters is essential for ensuring safe operations and user safety. Sauna heaters can reach very high temperatures. Ensuring a safe distance minimizes the risk of accidental burns, overheating, or ignition of nearby objects.

NB! Only a certified electrician may connect the heater to the power supply.
- A rubber insulated SIHF-JB cable or an equivalent cable must be used as the connection cable. It is forbidden to use a PVC insulated non-heat-resistant cable as the power cable of the heater.
- The junction box must be waterproof and located up to 19.7 in / 50 cm from the floor.
- It is recommendable to connect the unit to the mains power supply without an earth leakage circuit breaker.
The cross-sectional area of the cable and maximum amperage of the circuit breaker are provided in the table below.
Review safety distances: Check for the minimum safety distances required between the heater, the sauna room’s ceiling, and walls. The distance between the highest point of the heater and combustible ceiling material has to be minimum 1.2 meters.
Position the heater safely: Place the heater at a location that minimizes the risk of accidental contact with the heater.
Functionality: think about the best spot for comfortably pouring water onto the heater.
- CORE electric heater;
- adjustable legs (x4);
- installation and operation manual.
The delivery set of CORE Body model without exterior finish additionally includes:
- metal shields without finishing (4 pcs);
- cover strips for the upper edge (4 pcs);
- fastening screws for cover strips.
Sauna stones, the sauna controller (e.g. UKU), and the power cable are not included and must be purchased separately.
A rubber insulated SIHF-JB cable or an equivalent cable should be used as the connection cable. Connecting the unit to the mains is recommended without an earth-leakage circuit breaker (RCD).
NB! It is forbidden to use a PVC insulated non-heat-resistant cable as the power cable of the heater.
All electrical work — including cable installation and connection of the sauna heater to the power supply — must be performed by a certified electrician in accordance with local regulations and safety requirements.
CORE electric sauna heater requires 66 lb / 30 kg of sauna stones with a diameter of 2-4 in / 5–10 cm.
It is recommendable to use round stones in HUUM sauna heaters. Round stones complement the design of the heaters and provide milder steam. Our product range includes round olivine diabase sauna stones and are sold in packs weighing 33 lb / 15 kg.
NB! Choose stones that are specifically meant for use in sauna heaters, and avoid decorative stones as they may break easily.
- Wash the stones under running water to remove dust before use.
- Lay the stones one by one. Don’t pour or throw them into the heater!
- Start with larger stones at the bottom and sides, then use smaller stones to fill gaps. Lay the stones tightly but leave space for air circulation.
- Cover the outer surfaces of the heater tightly, ensuring the heating elements are not visible. Exposing them to water shortens their lifespan and creates excessively sharp heat.
You can find the user manual here.
Heating
Throwing water on the hot sauna stones enables you to raise the humidity and the apparent temperature according to your preferences.
- Sauna stones must be hot
The time is right for throwing the water on sauna stones when the stones are hot enough for complete vaporization of the water. You can try this by throwing a small amount of water.
- Use clean and warm water to add the steam
It is wise to use hot tap water to prevent the stones from breaking from the abrupt temperature change.
- Use a small amount of water at once
We recommend throwing approximately 80 ml of water at a time. If you desire more steam, wait a few minutes and throw the same amount of water on the sauna stones. This allows the stones to dry in the meantime and regain their heat. If you notice that water runs out from the bottom of the heater, it means you have poured too much water or that the stones are not hot enough.
Heating elements
Heating elements require replacement only when they are broken. Remove some stones from the sauna heater to verify that all the heating elements are in proper working order. If the heating elements do not turn red, they are likely damaged and must be replaced.
No, a sauna heater should not be used with a broken heating element!
Remove some stones to check that all elements glow red when the heater is on. If one doesn’t, it must be replaced promptly to prevent damage to the other elements.
Safety first! Wear gloves and use pliers when chaning the heating elements!
We recommend to take a picture before disconnecting the wires. This will help later when you have replaced the new heating element and are reconnecting the wires.
Troubleshooting
Are the heating elements functioning properly? To find out, remove some stones from the sauna heater and check if the heating elements warm up after switching the heater on. If a heating element does not turn red, it is damaged and needs to be replaced before further use of the heater.
Are the cables properly connected? Ask an electrician to disconnect the sauna heater from the power supply, and to verify that all cables of the heater and the controller are connected to the main module in accordance with the user manual of the sauna heater.
If this does not solve the problem, take a picture of the main module cabling and email it to your reseller with a description of the problem.
Is the power rating of the sauna heater sufficient for the size of your steam room? Control it from the user manual.
Are the heating elements functioning properly? To find out, remove some stones from the sauna heater and check if the heating elements warm up when the heater is switched on. If a heating element does not turn red, it is damaged and needs to be replaced before further use.
Is there too much ventilation in the steam room? Check the ventilation system in the steam room to ensure it is not allowing excessive airflow. Make sure the air intake and exhaust vents are properly adjusted to maintain a balance between fresh air circulation and heat retention.
A slight difference between the measured temperatures is completely normal. It derives from the intrinsic error of measurement that applies to the devices. However, if the difference exceeds 10–15 degrees, you should check the following:
- Are the temperature sensor and sauna thermometer placed in different locations in the steam room where the temperatures actually differ?
- Is the temperature sensor too close to the sauna heater? Or is it too close to the door?
The best location for the temperature sensor is 19.7 in / 50 cm from the heater and approximately 5.9 in / 15 cm from the ceiling. It should not be placed close to vents and should be min. 19.7 in / 50 cm from the windows and door.
If none of the causes described above apply, and the following problem persist, the fault likely resides in the temperature sensor or its wiring and it requires replacing. Please contact your reseller with a description of the problem and add a picture of your sauna room.
A temperature increase of up to 10 degrees is normal, as the large amount of stones retains heat, causing the temperature to rise slightly. Reason for this is the residual heat: the heating elements or stones in the sauna retain heat and continue to release it, causing the temperature to rise even after the heater stops.
Maintenance
Sauna stones don’t last forever. Contact with water and temperature fluctuations have an impact, and over time they eventually start crumbling. Therefore it is natural that every now and then they should be replaced with new stones.
Check the condition of sauna rocks once a year or after 300 hours of heating. If you heat your sauna three times a week on average, you should replace the sauna stones once a year. If you use your sauna less frequently, you should exchange the sauna stones once every couple of years.
The condition of the sauna heater should be checked every now and then. This is particularly important when the sauna heater has not been used for a while.
- Check the heating elements periodically for signs of wear, corrosion, or damage. Replace them if they appear burnt out or malfunctioning.
- Wipe the dust and dirt from the sauna heater with a moist cloth.
Heater accessories
HUUM CORE electric heater can be partially or fully installed inside the sauna bench or sauna floor along the entire height of the heater.
- the heater can be immersed in the bench up to the upper edge of the heater
- the heater should not be located deeper inside the bench than the surface of the bench
- air movement should be ensured under the bench.
The HUUM CORE heater offers several finishing options that allow you to customize the heater’s appearance to match your interior style.
Available wood panel options for the HUUM CORE heater:
- Aspen wood panels (4 pcs) – for a natural look.
- Alder wood panels (4 pcs) – a slightly different wood tone and texture.
- Thermo-aspen wood panels (4 pcs) – a more heat-resistant and stylish option.
Make sure that the material you want to finish the heater with is suitable for use in a sauna environment. If necessary, consult an expert to ensure safety and durability.
NB! The weight of one side panel including finishing must not exceed 44 lb / 20 kg.